Few costume ideas are as universally charming, instantly recognizable, and delightfully customizable as the humble Dalmatian. Whether you’re chasing after Cruella de Vil or simply looking for an adorable, spot-on ensemble for a themed party, diving into DIY Dalmatian Costume Ideas offers a creative adventure for all ages and skill levels. Forget the generic, store-bought options; crafting your own allows for personalization, ensures a perfect fit, and often comes with a satisfying sense of accomplishment – not to mention a little more cash left in your pocket for treats (or dog biscuits!).
This comprehensive guide will walk you through everything you need to know, from selecting your base to attaching that iconic tail. Get ready to unleash your inner artist and design a black-and-white masterpiece that truly stands out from the pack.
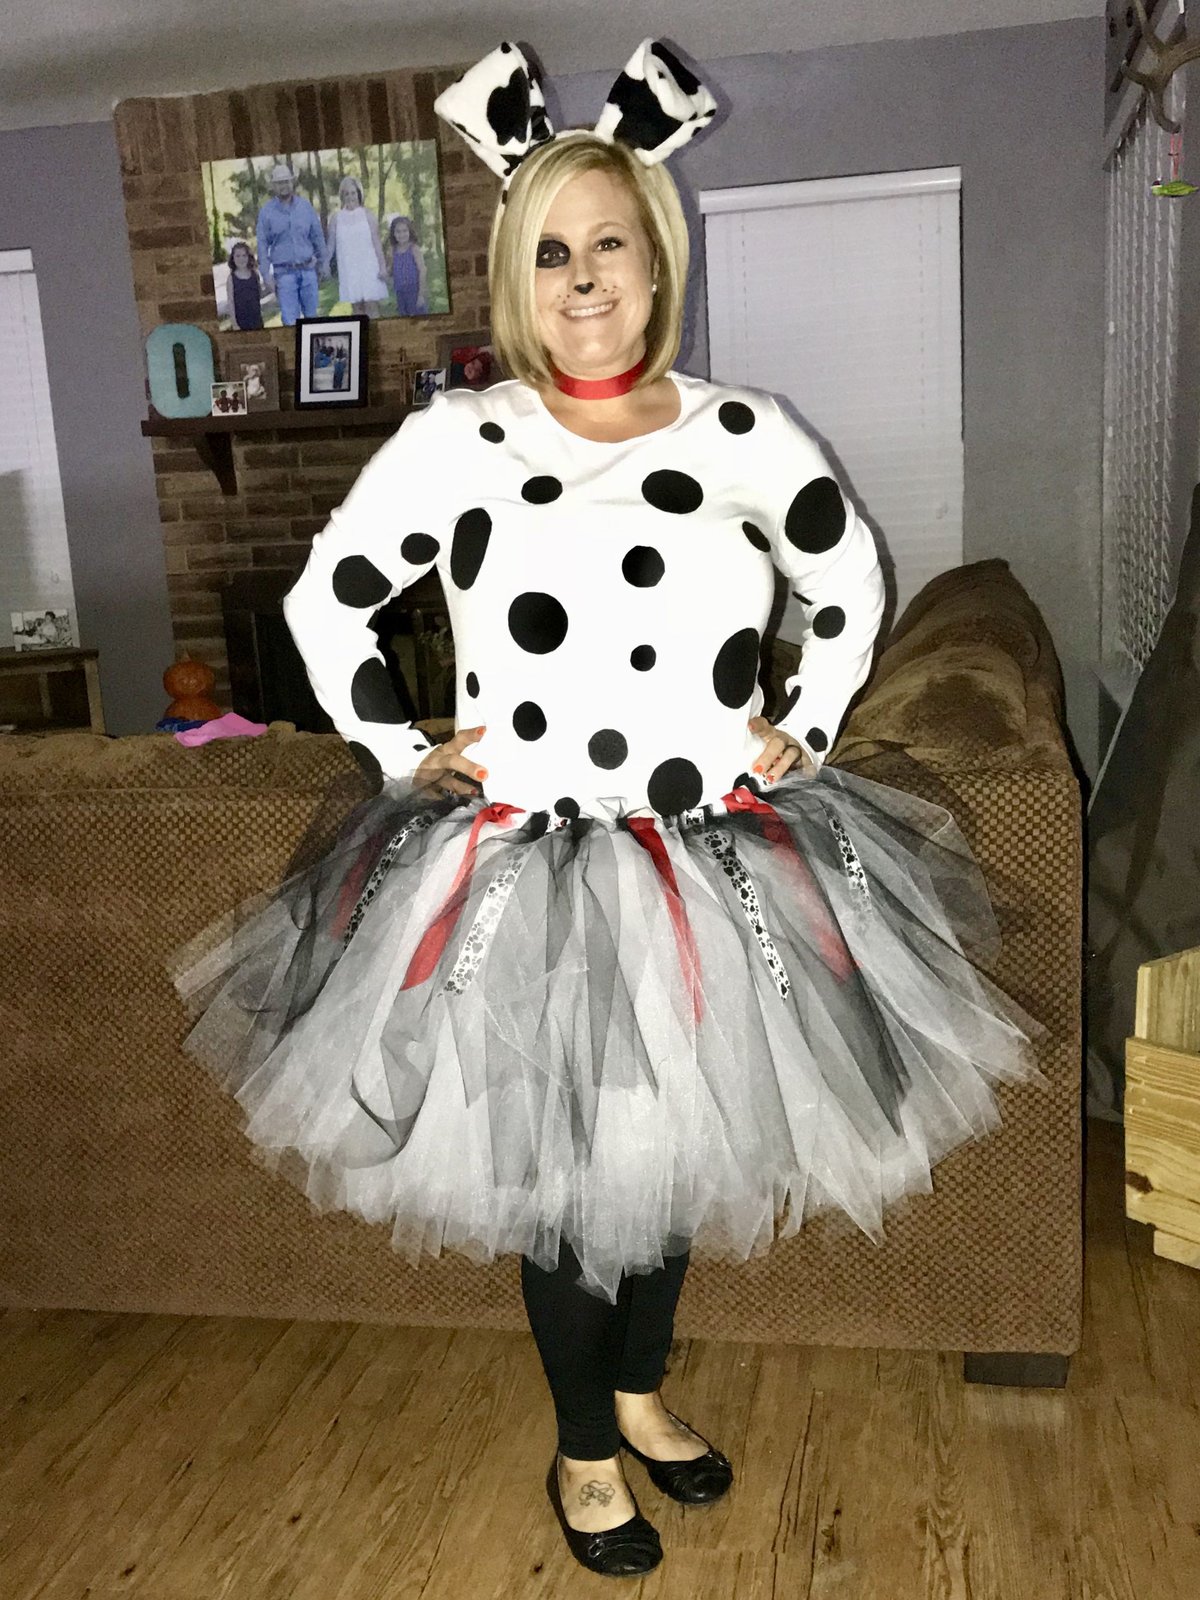
At a Glance: Your DIY Dalmatian Costume Essentials
- White is Your Canvas: Start with a plain white base — a shirt, dress, onesie, or even pajamas.
- Spot On: Choose your preferred method for adding black spots: paint, felt, iron-on vinyl, or even duct tape.
- Ears & Tail: Essential for that canine charm. Craft them from felt or fabric, often attached to a headband and safety-pinned to your clothing.
- Face Time: A black nose and a few strategically placed spots with non-toxic face paint complete the transformation.
- The Finishing Touch: A classic red collar with a yellow name tag adds personality.
- Versatility: These ideas adapt beautifully for babies, kids, adults, and even entire family groups.
Why Go DIY for Your Dalmatian Transformation?
In a world saturated with ready-made costumes, the allure of the do-it-yourself approach for a Dalmatian costume is undeniable. It's not just about saving money; it's about infusing personality and creativity into every spot. When you craft your own, you control the materials, ensuring comfort and durability that generic options often lack. You can tailor it to fit any body type, any age, and any specific vision you have – from a playful pup to a more elegant Perdita.
Moreover, the process itself can be a fantastic activity, whether you're a solo crafter or involving the whole family. It's a chance to bond, learn new skills, and create cherished memories long before the event even begins. Plus, there’s an inherent charm in a handmade costume, a unique touch that store-bought outfits simply can’t replicate. It shows effort, ingenuity, and a dash of personal flair that makes your spotted ensemble truly one-of-a-kind.
The Anatomy of a Dalmatian Costume: Breaking Down the Basics
Before we dive into the nitty-gritty of crafting, let's understand the core components that bring a Dalmatian costume to life. These elements are universally applicable, regardless of your chosen method or skill level.
- The Clothing Base: Your White Canvas
The foundation of any Dalmatian costume is a white base. Think of it as a blank canvas awaiting its iconic spots. The beauty here is its flexibility:
- For Adults: A simple white t-shirt, long-sleeved shirt, leggings, or even a white dress.
- For Kids: White pajamas, a plain white long-sleeved top and pants, or a white bodysuit.
- For Babies: A comfortable white onesie or sleepsuit is ideal.
The key is plain, white, and relatively comfortable, as this is what you'll be adorning with spots.
- The Spots: The Defining Feature
This is where the magic truly happens. Black spots are non-negotiable for a Dalmatian. The methods for applying them vary widely, catering to different preferences for permanence, ease of application, and visual effect. From paint to felt to iron-on vinyl, each technique offers a distinct look and level of effort. We'll explore these in detail shortly. - The Ears: Perky Pointers
Dalmatian ears are typically floppy yet alert, framing the face. They can be crafted from black or white felt, fabric, or even creatively adapted from other materials. Most commonly, they're attached to a simple headband, allowing them to stand up (or flop down!) just right. - The Tail: The Wagging Accessory
A playful, often curled, tail adds dynamic movement and instantly identifies your costume as canine. Typically made from black and white fabric, often stuffed for volume, it's usually attached to the back of your clothing with a safety pin or by sewing a small loop. - Face Paint: The Finishing Facial Touches
While optional for some, a touch of non-toxic white and black face paint or eyeliner can elevate your costume significantly. A black nose and a few small, strategically placed spots on the cheeks complete the transformation, adding that authentic doggy charm. - The Collar & Tag: A Badge of Identity
This small detail makes a huge difference. A simple fabric or faux leather collar, often adorned with a bright red ribbon and a yellow construction paper name tag, tells the world your Dalmatian's name and adds an adorable touch of personality.
Your DIY Dalmatian Tool Kit: Essential Materials for Success
Crafting a memorable Dalmatian costume doesn't require a specialty craft store trip – many items might already be lurking in your cupboards! Here's a comprehensive list of what you might need, categorized for clarity.
The Base:
- White t-shirt, long-sleeved shirt, dress, leggings, pants, pajamas, cardigan, or a onesie (for babies/toddlers).
For the Spots: - Black Fabric Paint: Acrylic paint mixed with a fabric medium, or dedicated fabric paint.
- Paintbrushes or Sponges: For applying paint.
- Black Felt Sheets: Regular felt (for gluing) or sticky-back felt sheets (for peel-and-stick convenience).
- Black Iron-On Vinyl: For a durable, clean finish (best with a cutting machine like Cricut).
- Black Permanent Markers: (e.g., Sharpie) or fabric markers for quick, simple spots.
- Black Duct Tape: For a super last-minute or temporary option.
- Optional: Cardboard (for stencils), clothespins (to hold fabric taut).
For Ears & Tail: - Plain Headband: Any color, as it will likely be covered.
- Black or White Felt/Fabric Scraps: For cutting ear and tail shapes.
- Stuffing: (e.g., poly-fill, cotton balls, fabric scraps) for the tail.
- Optional: White ankle socks (for painted ears), white pipe cleaners or floral wire (for tail shaping).
For Facial Touches: - Non-Toxic Black Face Paint: Or black eyeliner pencil.
- Non-Toxic White Face Paint: (Optional, for general face base if desired).
For the Collar & Tag: - Red Ribbon: Any width, preferably satin or grosgrain.
- Yellow Construction Paper: For the name tag.
- Black Marker: For writing the name.
General Tools & Adhesives: - Scissors: Fabric scissors for cleaner cuts.
- Hot Glue Gun and Glue Sticks: Indispensable for quick assembly.
- Sewing Machine & Thread: (Optional, for more advanced, durable construction).
- Iron or EasyPress: (If using iron-on vinyl).
- Safety Pins: For attaching the tail securely.
- Optional: Cricut machine (for vinyl), white string or elastic.
Crafting Your Spots: A Palette of Possibilities
The heart of your DIY Dalmatian costume lies in those iconic black spots. Here, we break down various methods, ranging from simple and speedy to more involved and durable, ensuring there’s a technique perfect for your skill level and available time.
1. Painted Perfection: The Classic Spot Method
Painting spots directly onto your white clothing is arguably the most traditional and versatile method. It allows for organic shapes and varying sizes, giving your Dalmatian a truly unique look.
- Materials: White clothing base, black fabric paint (or acrylic mixed with fabric medium), paintbrushes or sponges, cardboard (optional, for stencils).
- How-To:
- Prepare Your Surface: Lay your white clothing flat on a protected surface (old newspaper, plastic sheet). If painting a t-shirt, place a piece of cardboard inside to prevent paint from bleeding through to the back.
- Plan Your Spots: Consider varying the size and shape of your spots. Dalmatians have irregular spots – some small, some large, some almost merging. A good distribution helps create a natural look.
- Apply the Paint:
- Freehand: Dip your paintbrush or sponge into the black fabric paint. Gently dab or paint irregular circles and blob shapes onto the fabric. Don't strive for perfection; asymmetry is your friend here!
- Stencils: For more uniform spots, you can cut various sized circles from cardboard and use them as stencils. Hold the stencil firmly against the fabric and dab paint inside.
- Dry & Set: Allow the paint to dry completely. Fabric paints often require a curing period, sometimes involving heat setting with an iron (check your paint's instructions). This step is crucial for making the spots washable and durable.
- Pro Tips:
- Start with larger spots, then fill in gaps with smaller ones.
- Use a dry brush technique for slightly faded or less intense spots.
- Fabric paint tends to be more flexible and resistant to cracking than regular acrylic paint.
- If using acrylic, mixing it with a fabric medium (available at craft stores) will make it suitable for clothing.
2. Felt Fantasies: Easy, No-Mess Spots
Felt spots offer a clean, precise, and often quicker alternative to paint. They provide a tactile texture and are fantastic for those who prefer not to deal with wet paint.
- Materials: White clothing base, black felt sheets (regular or sticky-back), scissors, hot glue gun and glue sticks (if not using sticky-back felt).
- How-To:
- Cut Your Spots: Using scissors, cut various sizes of irregular black felt circles and blob shapes. Aim for a good mix to keep the look natural.
- Arrange & Adhere:
- Hot Glue: Lay your white clothing flat. Arrange the felt spots on the fabric until you’re happy with the distribution. Then, using a hot glue gun, carefully glue each spot into place. A small bead of glue around the edge or a dab in the center is usually sufficient.
- Sticky-Back Felt: Simply peel the backing off your pre-cut felt shapes and stick them directly onto the fabric. This is the fastest and least messy method!
- Pro Tips:
- Overlap a few spots for a more dynamic and less "placed" look.
- Felt spots are generally not as machine-washable as properly heat-set paint or iron-on vinyl. Hand washing or spot cleaning is recommended for longevity.
- Consider using different shades of black or even dark grey felt for subtle variations.
3. Iron-On Magic: Precision Spots with a Cricut (or by Hand)
For the ultimate in clean lines, durability, and a professional finish, iron-on vinyl is a fantastic choice, especially if you have a cutting machine like a Cricut or Silhouette.
- Materials: White clothing base, black iron-on vinyl (HTV - Heat Transfer Vinyl), scissors, iron or EasyPress, optional: Cricut machine, weeding tools.
- How-To:
- Design & Cut:
- Cricut Method: Design various sized black spots in your Cricut software. Place the iron-on vinyl onto your mat (shiny side down!), load it into the machine, and cut your designs (remember to mirror your image if it has a specific orientation, though not necessary for random spots). Weed away the excess vinyl, leaving only your spots on the clear carrier sheet.
- Hand Cutting: If you don't have a cutting machine, you can draw irregular spot shapes onto the paper backing of the iron-on vinyl and carefully cut them out with scissors or a craft knife.
- Pre-Press: Heat your iron or EasyPress to the recommended temperature for your vinyl. Pre-press your white clothing for a few seconds to remove any moisture and wrinkles.
- Position & Press: Place your vinyl spots (still on their clear carrier sheet) onto your clothing, arranging them as desired. Apply heat with your iron or EasyPress, following the vinyl manufacturer's instructions for time and pressure.
- Peel: Once cooled (or warm, depending on your vinyl type), carefully peel away the clear carrier sheet, leaving the perfectly adhered black spots behind.
- Pro Tips:
- Iron-on vinyl creates very durable, washable spots that hold up well over time.
- Ensure your heat source is evenly distributed and you apply consistent pressure.
- Always do a small test patch on an inconspicuous area first if you're unsure about heat settings.
- Remember that for Your perfect dalmatian costume, durability often means you can reuse it for future events!
4. Duct Tape Doodles: The Speedy Spot Solution
When you're truly in a pinch and need a temporary costume fast, black duct tape can come to the rescue. This method is quick, easy, and requires minimal tools.
- Materials: White clothing base, black duct tape, scissors.
- How-To:
- Cut Shapes: Tear or cut irregular spot shapes from the black duct tape. You can create different sizes.
- Stick On: Simply adhere the duct tape spots directly onto your white clothing.
- Pro Tips:
- This method is best for very temporary costumes, as duct tape can leave residue or pull threads on fabric if left on too long or removed carelessly.
- It's not washable and won't stand up to much wear and tear, but it's unbeatable for speed!
- Great for adding spots to accessories like bags or shoes too.
5. The Last-Minute Dash: Assembling Your Look in a Flash
Sometimes, creativity hits you just hours before an event. Don't panic! A compelling Dalmatian costume can still be pulled together with minimal effort and some clever shortcuts.
- Materials: White pajamas or a plain white t-shirt and leggings, black felt, headband, safety pins, black eyeliner or face paint, optional: store-bought ear/tail set, red ribbon.
- How-To:
- Base Layer: Start with white pajamas, a white t-shirt, and white leggings. Comfort is key when you're rushing.
- Ears: Cut two simple ear shapes from black felt. Hot glue them directly onto a headband. (If no hot glue, use strong double-sided tape or stitch loosely).
- Tail: Cut a long, irregular strip of black and white felt. Roll it up, dab some hot glue to secure the roll, and attach a safety pin to one end. Pin it to your pants or back of your shirt.
- Spots: If you have a black permanent marker or fabric marker, draw a few irregular spots directly onto your clothing. For quick, non-permanent spots, use eyeliner or face paint on the clothes, or just skip to face paint.
- Face: Use black eyeliner or face paint to draw a small black nose at the tip of your own nose and a few small spots on your cheeks.
- Collar: Tie a red ribbon around your neck for a quick collar.
- Pro Tips:
- If you can find a pre-made Dalmatian ear and tail set at a party store, grab it! It saves valuable time.
- Focus on the key identifying features (ears, nose, a few spots) rather than trying to cover every inch.
- Embrace the simplicity; sometimes less is more for a last-minute look.
6. Sewn Sensations: The Full-Body Transformation (More Advanced)
For those with sewing skills and a desire for a truly immersive and durable costume, a full-body sewn Dalmatian suit is the ultimate project. This method offers unparalleled comfort and longevity.
- Materials: White and black spotted fleece fabric (or plain white fleece + black felt/fabric for spots), sewing machine, thread, sewing pattern (e.g., Simplicity Pattern #4871 or similar animal onesie pattern), stuffing, zipper.
- How-To:
- Select a Pattern: Look for a pattern specifically designed for animal costumes or onesies. These often include instructions for ears and tails.
- Choose Fabric: Spotted fleece fabric is ideal for its softness, warmth, and inherent Dalmatian look. Alternatively, use plain white fleece and either sew on black felt spots or cut them from black fleece and appliquéd them on.
- Cut & Sew: Follow your chosen pattern's instructions carefully. This typically involves cutting out all the pieces (body, sleeves, legs, hood, ears, tail), sewing them together, adding a zipper for closure, and stuffing the tail.
- Detailing: Attach the ears to the hood and the tail to the back. You might add paw pads to feet or glove extensions.
- Pro Tips:
- Fleece is forgiving for beginners and doesn't fray easily.
- Take accurate measurements to ensure a comfortable fit.
- Consider adding elastic to the wrists and ankles for a snugger fit.
- This is an investment of time and effort, but the result is a professional-looking costume that can be worn for years.
Bringing Your Dalmatian to Life: Ears, Tails & Canine Charm
Once your spots are in place, it’s time to focus on the anatomical details that truly complete your transformation into a lovable Dalmatian.
Perky Pups: Crafting Adorable Ears
Dalmatian ears are distinct – often black, floppy, and set on top of the head.
- Felt Ear Method (Most Common):
- Cut Shapes: Cut two elongated, slightly rounded ear shapes from black felt. They should be roughly 4-6 inches long, depending on the head size. You can also cut slightly smaller white inner ear shapes for more detail.
- Attach to Headband: Fold the bottom edge of each felt ear around a plain headband. Use a hot glue gun to secure the felt in place, pinching it tightly around the headband. You can also stitch them on for extra durability. Position them a few inches apart.
- Painted Sock Ears:
- Prepare Socks: Take a pair of clean, white ankle socks.
- Paint Black: Paint the socks entirely black with fabric paint. Let dry completely.
- Shape & Attach: Once dry, flatten the socks into ear shapes. Attach them to a headband using hot glue or by sewing them on. This creates a slightly more voluminous ear.
- Pre-made Ears: For maximum convenience, you can purchase a black or Dalmatian-spotted ear headband from a costume or party store.
A Wagging Tale: Building Your Dalmatian Tail
A tail adds fantastic movement and playfulness to your costume.
- Fabric & Stuffing Method:
- Cut Fabric: Cut two identical, elongated "banana" or "S-curve" shapes from black or black-and-white spotted fabric. The length depends on who is wearing it, but generally 12-18 inches is good for adults.
- Sew: Place the two fabric pieces right sides together and sew along the curved edges, leaving the wide bottom end open.
- Stuff & Turn: Turn the tail right side out. Lightly stuff it with poly-fill, cotton balls, or even fabric scraps to give it volume and shape. For a bendable tail, you can insert a white pipe cleaner or floral wire before stuffing.
- Attach: Fold the open end of the tail inwards and sew it closed, creating a flat tab. Attach a large safety pin to this tab. You can then pin the tail securely to the back of your pants, skirt, or dress. For greater stability, sew small fabric loops onto your clothing and thread the safety pin through.
- Felt Tail (Quick Version):
- Cut an elongated, irregular shape from black felt.
- Roll it loosely or twist it slightly. Use a dab of hot glue to hold the shape.
- Attach a safety pin to one end and pin it to your clothing. This is a flatter, less voluminous tail but works well in a pinch.
Face It: Noses, Whiskers, and Facial Spots
Face paint transforms your human features into charming canine ones.
- Materials: Non-toxic black face paint (or eyeliner), optional: white face paint.
- How-To:
- The Nose: Using black face paint or eyeliner, draw a neat black circle or inverted triangle on the tip of your nose, extending slightly onto your philtrum (the groove between your nose and upper lip). Fill it in solid black.
- Whiskers (Optional): Lightly draw a few small dots on either side of your upper lip where whiskers would emerge. You can even draw thin lines extending outwards from these dots if desired.
- Facial Spots: Add a few small, irregular black spots on your cheeks, forehead, or around your eyes. Don't overdo it – a few well-placed spots are more effective than a full coverage.
- White Base (Optional): If you desire a more dramatic effect, you can apply a thin layer of white face paint to your face first, then add the black details.
- Pro Tips:
- Always use non-toxic face paint designed for skin. Do a patch test on a small area of skin first to check for any allergic reactions.
- Keep a mirror handy and work slowly for precision.
- A fine-tipped brush or cotton swab can help with detail work.
The Signature Collar & Tag: A Finishing Touch
This small detail adds a huge amount of authenticity and cuteness to your Dalmatian costume.
- Materials: Red ribbon (satin or grosgrain works best), yellow construction paper, black marker, optional: small piece of cardboard.
- How-To:
- The Collar: Tie a length of red ribbon around your neck. You can leave it as a simple bow or secure it with a knot and trim the ends. For a sturdier collar that won't shift, you could glue the ribbon onto a piece of fabric or faux leather.
- The Tag: Cut a classic bone shape or a simple circle from yellow construction paper. For added durability, you can glue the construction paper onto a thin piece of cardboard.
- Personalize: Use a black marker to write your Dalmatian's name (e.g., "Pongo," "Perdita," or your own chosen pup name) on the yellow tag.
- Attach: Punch a small hole in the top of the tag and thread a small piece of string or ribbon through it, then tie it to your red collar. Alternatively, you can simply hot glue the tag directly onto the ribbon collar.
- Pro Tips:
- Ensure the collar is comfortable and not too tight around the neck.
- If using cardboard for the tag, glue the yellow paper to both sides for a finished look.
Beyond the Spots: Creative Variations & Group Ideas
The beauty of the Dalmatian costume is its adaptability. You can tailor it for specific characters, age groups, or even coordinate it into a memorable group ensemble.
Tiny Pups: Adorable Baby Dalmatian Costumes
For the littlest ones, comfort and simplicity are paramount.
- White Onesie Base: A plain white onesie or a soft, white sleepsuit is the perfect starting point.
- Gentle Spots: Use fabric paint for spots, ensuring it's completely dry and heat-set before dressing your baby. Alternatively, use black felt spots attached with fabric glue for softness, avoiding any itchy edges.
- Comfy Ears: For infants, soft felt ears attached to a stretchy baby headband are ideal. Ensure there are no small, detachable parts that could pose a choking hazard.
- No Tail (or Soft Tail): A tail might be uncomfortable for a crawling or sitting baby. If desired, create a very soft, lightly stuffed fabric tail, ensuring it doesn't get in the way.
- Minimal Face Paint: A tiny black nose drawn with a non-toxic face paint stick is usually enough; avoid spots on very young children's delicate skin.
Channeling Perdita: A Nod to the Iconic Mama
If you're a fan of Disney's 101 Dalmatians, you might opt for a more refined look inspired by Perdita herself.
- Elegant Base: Instead of a simple t-shirt, consider a white bodysuit, a fitted white long-sleeved top, or a sleek white dress paired with black leggings.
- The Blue Collar: Perdita is known for her distinctive blue collar. Use a blue velvet ribbon or a simple blue fabric collar instead of red. A subtle, elegant tag would be fitting.
- Subtle Spots: Opt for iron-on vinyl spots or carefully placed felt spots for a polished look.
- Accessory Details: Pair with black flats or low heels. Keep makeup refined, focusing on a clean white base and precise black eyeliner for the nose and a couple of beauty mark-like spots.
The Cruella Crew: Pairings for a Themed Event
A Dalmatian costume is an ideal counterpart for a Cruella de Vil costume, making for an unforgettable duo or group theme.
- Cruella's Look: For Cruella, think a chic black dress, a dramatic faux fur coat (preferably white with black accents), long red gloves, and a signature half-black, half-white wig. Bold red lipstick and exaggerated green eyeshadow complete her villainous aesthetic.
- Henchmen Jasper & Horace: Other members of your group could dress as Cruella's bumbling henchmen, often wearing rough, dark clothing, caps, and perhaps a prop like a net or a sack.
- Coordinated Dalmatians: If you have multiple Dalmatians, ensure their spots are consistent in style (e.g., all painted, all felt, or all iron-on) to create a cohesive "pack" look.
Family Pack: Coordinated Fun for Everyone
A family of Dalmatians is undeniably adorable and always a crowd-pleaser.
- Unified Spot Style: Decide on one or two primary spot-creation methods (e.g., painted for adults, felt for kids) to ensure a cohesive look across all costumes.
- Color Consistency: Ensure all white bases are a similar shade, and all black spots are the same color.
- Age-Appropriate Details: Adapt the complexity of ears, tails, and face paint for each family member, as outlined in the "Tiny Pups" section.
- Personalized Tags: Each family member can have their own unique "dog name" on their collar tag, adding a fun, personalized touch.
- Optional Props: Consider adding a shared prop like a leash (for a "puppy walker") or a giant "dog bone" for playful photo opportunities.
Pro Tips & Pointers for a Spot-On Costume
Crafting a DIY costume is rewarding, but a few expert insights can elevate your creation from good to absolutely fantastic.
- Durability and Longevity: If you want your costume to last beyond one wear, invest in quality materials. Fabric paint, iron-on vinyl, and sewn felt spots will withstand more movement and gentle cleaning than markers or duct tape. Always check care instructions for your chosen materials.
- Comfort is Key: You'll likely be wearing this costume for several hours. Choose a white base that is comfortable and allows for ease of movement. Ensure ears don't pinch, and tails aren't cumbersome. For kids, this is especially important to prevent meltdowns!
- Safety First: When working with hot glue guns, supervise children closely. Always use non-toxic face paint and do a small patch test on the skin before full application. Ensure any small accessories (like buttons on a collar) are securely attached, especially for costumes worn by young children, to avoid choking hazards.
- Pre-Wash Fabrics: If you're painting or ironing onto new clothing, pre-wash the fabric first. This removes any sizing that might repel paint or vinyl, ensuring better adhesion.
- Practice Makes Perfect: If you're nervous about freehand painting spots, practice on a scrap piece of white fabric first. This helps you get a feel for the brush and paint consistency.
- Consider the Weather: If your event is outdoors, factor in the temperature. Fleece can be warm, while a t-shirt and leggings might need an added layer.
- Storage & Reusability: If you plan to reuse your costume, store it carefully. Lay costumes flat or hang them to prevent spots from creasing or sticking together. If spots were glued, placing tissue paper between layers can prevent adhesion issues.
Unleash Your Inner Artist: Your Next Steps
Now that you're armed with all the essential DIY Dalmatian Costume Ideas, tools, and techniques, it's time to let your imagination run wild. Whether you're aiming for painted perfection, the tactile charm of felt, or the sleek finish of iron-on vinyl, the path to your unique spotted creation is clear.
Remember, the goal isn't just a costume; it's an expression of your creativity and a testament to the joy of making. Gather your materials, clear a workspace, and perhaps put on your favorite upbeat playlist. Don't be afraid to experiment, to personalize, and to most importantly, have fun with the process.
Soon, you'll be ready to step out as the most charming, perfectly spotted pup around, turning heads and wagging tails wherever you go. Get ready for compliments, because a handmade Dalmatian costume is always a showstopper. Go on, get crafting – your spot-on adventure awaits!